You can quantize in Ableton Live by enabling Record Quantization option from the “Edit” menu, which will work for MIDI recordings. You can also manually adjust MIDI notes in the “MIDI Editor” window by dragging them within the grid for proper timing.
My name is Donovan, and I’m an audiophile, producer, musician, and home studio enthusiast. I’ve spent a lot of time working in Ableton Live and have experience using most of the features and functions of this DAW.
This post will show you how to quantize in Ableton Live. I’ll walk you through all the steps to get your MIDI recordings quantized while you record them or make necessary adjustments to the tempo after the fact.
Let’s dig in.
Contents
Detailed Guides to Quantize in Ableton Live
You can use quantization in your Ableton Live projects in a few different ways. I’ve used all of these for various purposes, so I think it’s good to know when and why you might want to use one over another.
You can enable record quantization before laying down a track, move MIDI notes around in the MIDI editor window after recording them, and use the Quantize Command from the MIDI editor.
For me, enabling quantization from the start of recording isn’t always my go-to option. I prefer to make adjustments after I’ve recorded a MIDI track. I feel like this helps the track sound more live than robotic, but that’s a personal preference.
But like I said, knowing how to do all three methods is a good idea to give you the most tools and control over your Ableton projects.
How to Quantize with the Record Quantization Option
1. Open a new or existing Ableton Live project.
2. Select the Edit menu from the top of your screen.
3. Select Record Quantization from the drop-down menu.

4. Once you select Record Quantization, choose the meter or timing of the quantization you want. I typically go with the Eighth-Note Quantization option because this helps keep the tracks sounding live and human rather than robotic and too rigid.
But for drum tracks or something that really needs to be exactly on the beat, you might want to go with Sixteenth-Note Quantization; it depends on your preferences and the needs of your projects.

5. Now you can record your audio project as usual, and the MIDI track you lay down will automatically be quantized to whatever parameters you set up.
How to Quantize in Ableton using the MIDI Editor Window
1. Record your MIDI track in a new or existing Ableton Live project.
2. Click on your MIDI track to display the MIDI Editor in the window at the bottom of the screen.

3. Click on the note or notes that you want to quantize.
4. Use the click-and-drag method to move the notes to wherever you want them arranged in the timing grid. The various rectangles of the grid indicate where beats start, so you can line up your notes accordingly to get them quantized.
The numbers at the top of the editor indicate the measure, which you can use to keep track of where you are in the take to line up notes accurately.

Pro Tip: The MIDI Editor has many more features than just quantization. You can also adjust the note’s length, pitch, attack, and other components here. It’s a great editing tool to use if you aren’t a great musician.
How to Quantize in the MIDI Editor Using the Quantize Command
If you want to be a bit more precise with your quantization in the MIDI Editor, you can use the Quantize command rather than manually moving the notes.
1. Follow steps 1-3 from the section above.
2. With the note highlighted that you want to quantize, press Command-U (on a Mac) or Control-U (on a PC). This will snap the note you have selected to the grid based on the quantize settings you have set up.
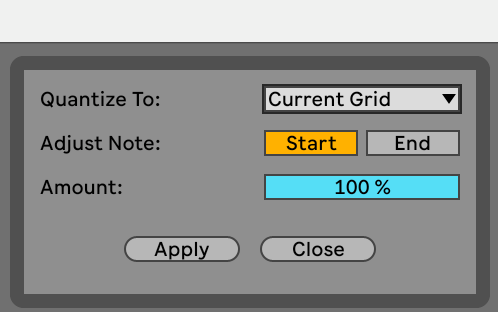
You can make adjustments to your quantize settings by selecting Quantize Settings from the Edit menu. You’ll see a window open like the one below, and you can adjust your settings there.
Final Thoughts
Knowing how to quantize in Ableton Live is another feature I use often. In my experience, it’s a great way to get your MIDI tracks on time and sounding great, especially if you aren’t that great at laying them down live on a keyboard.
Keep in mind that too much quantization on a track can make things sound pretty robotic. That might be the effect you are going for, but it can also be too much and sound off. It’s good to experiment with various settings to avoid that.
What is your preferred quantization setting or method? Let me know in the comments below.
