You can use the Arpeggiator in Ableton Live by adding this effect to a MIDI track within a Live Set. The Arpeggiator is found in the MIDI Effects folder of your Collections, and there are several different settings to choose from.
I’m Donovan, and I’ve spent hundreds of hours exploring Ableton Live. I’ve used the Arpeggiator in various situations and projects and know through first-hand experience how to add and incorporate it into my Ableton projects.
This post will instruct you how to use the Arpeggiator in Ableton Live. I’ll show you where to find this feature, how to add it to a MIDI track, how to make adjustments and provide you with some other related information.
Let’s get to it.
An Easy Guide to Using Arpeggiator in Ableton Live
Using the Arpeggiator in Ableton Live can add a lot to your MIDI tracks or just give you another fun, creative element to work with and explore. You can add this effect to any MIDI track simply by dragging it onto a track.
Follow these steps to add the Arpeggiator to a MIDI track in Ableton Live:
1. Open a new or existing Live Set.
2. Make sure you have a MIDI track in the Set.
3. Select the MIDI Effects folder from your Collections.
4. Select Arpeggiator.

5. Choose one of the Arpeggiator options and drag it onto your MIDI track. You’ll see the effect window appear at the bottom of your project.

6. Now, add a software instrument to the same MIDI track. Select the Instruments folder from your Collections, choose whatever you want to work with, and drag/drop onto the MIDI track. I like using a Keys/Piano option with the Arpeggiator.

Now that you have a software instrument and the Arpeggiator on the same MIDI track, you can begin using the effect. Make sure you have monitoring on and then play your MIDI controller or keyboard to hear what the effect sounds like.

When you play a single note, you won’t really hear the effect. The Arpeggiator will kick in when you play a chord, and it will bounce around each note of the chord or series of notes you are playing on the controller/keyboard.
Play with the Style of the Arpeggiator to hear various patterns of playback. You have 18 options to choose from, so there is a lot to explore. A few of my favorite options here are Pinky Up and UpDown.

When you select one of these presets, you’ll notice that the knobs in the effects panel adjust slightly. You can choose any of the presets to work with, or you can fine-tune any of them to your personal preferences.
I like to play around with the Rate and the Groove. The more you explore all of the features in the Arpeggiator, the more you’ll be able to see what it can do and how you can apply it to your projects.
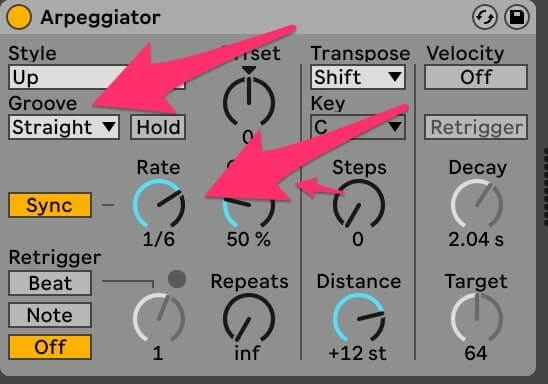
You can also set up the Arpeggiator to be in Sync with the tempo of your project by ensuring that the Sync button is highlighted. If you want to try something outside the box, turn that button off and get creative.
Once you have the Arpeggiator, set up and dialed in how you want it, record a clip to your project using it. If you don’t know how to record an audio/MIDI clip, check out this post before going any further.
Additional Tips/Tricks
Be sure to take a look at all of the various Arpeggiators that come with Ableton Live. There are a few basic ones that aren’t super interesting, but there are also other options that can add a lot to an electronic jam. The Housier Than Thou option is a good example of this.

If you’ve never used the Arpeggiator before, I suggest exploring all of the preset options in the device control panel rather than trying to dial in your own settings. This will be faster and also not as overwhelming.
If you want to get experimental, try the Random style option. This will give you a random series of arpeggiated MIDI notes. I’ve used this multiple times to come up with some cool elements that I would have never thought of myself.
Final Thoughts
Setting up the Arpeggiator on a MIDI track in Ableton Live is very straightforward, but the sky is the limit from there. Just like any other instrument or effect, take the time to explore this feature to see how you can build it into a Live Set.
It’s also fun to explore how the Arpeggiator sounds on various software instruments. While I like it on keys the most, something else might be entirely different for your ears.
How do you like to use the Arpeggiator in your projects? Let me know in the comments below.
